Load balancing is a fundamental component of system design, crucial for distributing network traffic across multiple servers to ensure optimal resource utilization, reduce latency, and prevent any single server from becoming a point of failure. By providing redundancy and scaling capacity, load balancers enhance both the reliability and performance of applications, making them resilient to high traffic and unexpected spikes in demand.
In This Session, We Will:
- Create an initial API
- Clone the first API for a second instance
- Set up an Nginx server
- Run docker compose up
The APIs
For this demonstration, we’ll use FastAPI due to its simplicity and Python’s robust package ecosystem, which makes it easy to demonstrate these concepts. Start by creating a file named api1.py:
from fastapi import FastAPI
import uvicorn

app = FastAPI()

@app.get("/hc")
def healthcheck():
    return 'API-1 Health - OK'

if __name__ == "__main__":
    uvicorn.run(app, host="0.0.0.0", port=8001)
Here, FastAPI is our web framework, and we’ll use uvicorn as the http server to run the API. Both are listed in the requirements.txt file. This example features a simple health check endpoint. In real-world applications, the implementation could be some CRUD method that is far more complex.
To avoid configuration issues and permissions on your machine, we’ll use Docker for a clean setup. Here’s the Dockerfile for api1.py:
FROM python:3.11
COPY ./requirements.txt /requirements.txt
WORKDIR /
RUN pip install -r requirements.txt
COPY . /
ENTRYPOINT ["python"]
CMD ["api1.py"]
EXPOSE 8001
Now, let’s create a second API by duplicating everything except the port. This second API will be named api2.py and will run on port 8002:
from fastapi import FastAPI
import uvicorn

app = FastAPI()

@app.get("/hc")
def healthcheck():
    return 'API-2 Health - OK'

if __name__ == "__main__":
    uvicorn.run(app, host="0.0.0.0", port=8002)
The Dockerfile for api2.py is identical except for the port number is 8002
FROM python:3.11
COPY ./requirements.txt /requirements.txt
WORKDIR /
RUN pip install -r requirements.txt
COPY . /
ENTRYPOINT ["python"]
CMD ["api2.py"]
EXPOSE 8002
Setting Up the Load Balancer
For this demonstration, we’ll use Nginx, a powerful open-source web server that can also handle load balancing. Although there are other options, including AWS’s Application Load Balancer, Nginx is sufficient for illustrating the basic concepts.
The goal is to have two identical APIs taking requests in a round-robin fashion. While this may seem trivial at a small scale, it becomes crucial as the number of users increases. Technologies like AWS Fargate allow you to scale dynamically based on load, starting with two services and automatically spinning up more as needed.
Here’s the Dockerfile for Nginx:
FROM nginx
RUN rm /etc/nginx/conf.d/default.conf
COPY nginx.conf /etc/nginx/conf.d/default.conf
EXPOSE 80
EXPOSE 8080
Next, we need to configure the Nginx load balancer by specifying the API IP addresses and ports. This is all specified in the docker_compose.yml which we will get to in a minute. Create a file called nginx.conf and add the code below.
upstream loadbalancer {
  server 172.20.0.4:8001;
  server 172.20.0.5:8002;
}

server {
    listen 80;
    location / {
        proxy_pass http://loadbalancer;
    }
}

The ip addresses above are from the docker containers.
Final Setup with Docker Compose
Now, let’s set up a small, multi-service application using a docker-compose.yml file. This file will configure the infrastructure, specifying IPs, ports, and references to the APIs and load balancer:
version: '3'
networks:
  frontend:
    ipam:
      config:
        - subnet: 172.20.0.0/24
          gateway: 172.20.0.1

services:
  api1:
    build: ./api1
    networks:
      frontend:
        ipv4_address: 172.20.0.4
    ports:
      - "8001:8001"

  api2:
    build: ./api2
    networks:
      frontend:
        ipv4_address: 172.20.0.5
    ports:
      - "8002:8002"

  nginx:
    build: ./nginx
    networks:
      frontend:
        ipv4_address: 172.20.0.2
    ports:
      - "80:80"
    depends_on:
      - api1
      - api2
Breakdown:
- Networks Section: Defines custom networks for our services, with specific IP address management (IPAM) configuration.
- Subnet: Specifies a range of 256 IP addresses (from 172.20.0.0 to 172.20.0.255).
- Gateway: Defines the default gateway at 172.20.0.1.
- Services Section: Specifies the containers that will make up this application.
- API1 and API2: Each has a fixed IP address and port mapping.
- Nginx: Connects to the frontend network, maps port 80, and depends on the two API services.
Running the Setup
Finally, run docker-compose up on the docker-compose.yml file to start all Docker instances.


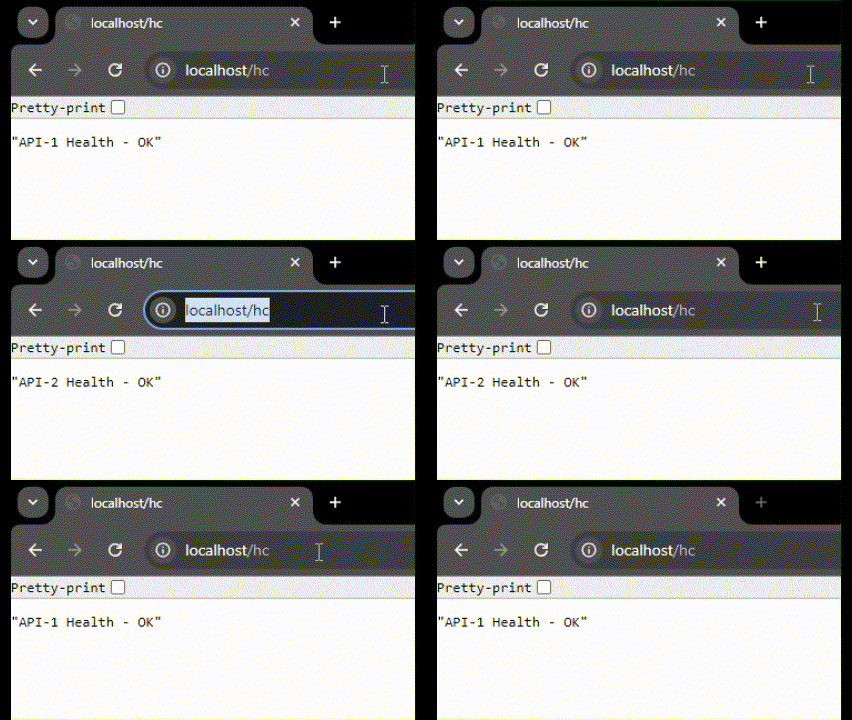
Once everything is up and running, you can test the load balancer by accessing http://localhost/hc. You’ll notice that requests are distributed between the two servers in a round-robin manner, effectively demonstrating the basics of load balancing.

As you scale, more advanced solutions can provide geographic load balancing, dynamic scaling, and more.
Thank you for following my blog
Please find the code here
